Problems to solve
- Customer does have a Jira Data Center behind the firewall and Jira Cloud is not able to access it to get the attachments.
- We tried to download the CSV with all the fields to get the comments and attachments and an error was returned due to the number of custom fields
Download all the attachments within scope
This script will download every attachment within the issues in the JQL provided to your local machine.
It will create a structure that will look like the image below:
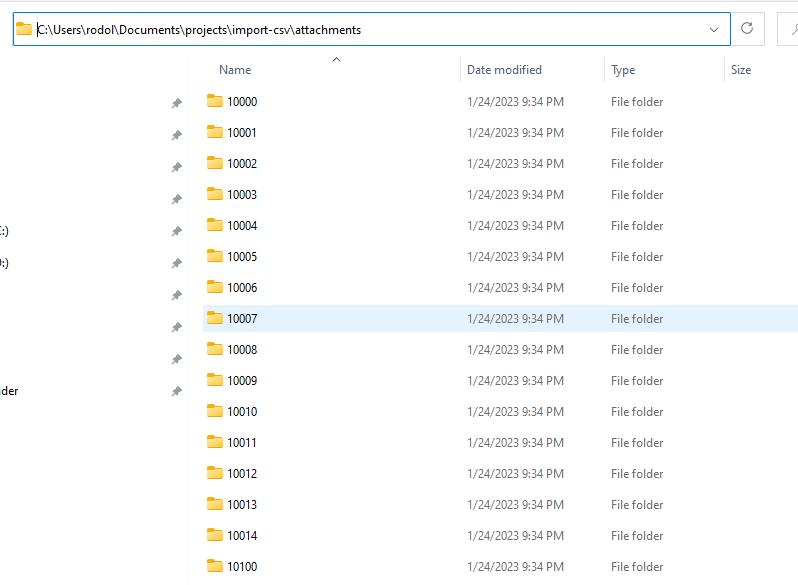
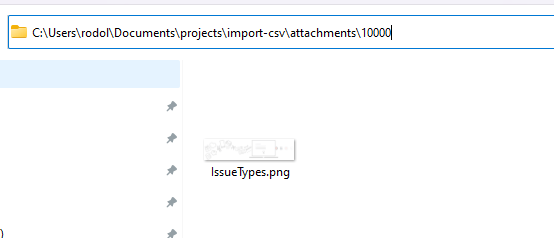
Inside each folder (that has the name as the ID of the attachment), will be placed the corresponding attachment.
To run the script you need to install the following libraries:
pip install atlassian-python-api
Script to download the attachments to your local machine
import os
from Atlassian import Jira
import requests

u='<username>' #Your username
p='<passoword>' #Your password

# Jira connection details
jira = Jira(
    url='<server_instance_url>',
    username=u,
    password=p
)

# JQL query
jql = "<the_JQL_to_download_the_attachments"

# Folder to download attachments to
download_folder = "C:\\Users\\rodol\\Documents\\projects\\import-csv\\attachments" #the folder that you want to download the attachments

# Get all issues matching the JQL
issues = jira.jql(jql)

# Iterate through each issue
for issue in issues['issues']:
    attachments = issue['fields']['attachment']
    # Iterate through each attachment
    for attachment in attachments:
        # Download the attachment to the specified folder
        response = requests.get(attachment['content'], auth=(u, p))

        if response.status_code == 200:

            if not os.path.exists(download_folder + "\\" + attachment["id"]):
                os.makedirs(download_folder + "\\" + attachment["id"])

            with open(download_folder + "\\" + attachment["id"] + "\\" + attachment['filename'] , 'wb') as f:
                f.write(response.content)
        else:
            print(f'Error: {response.status_code}')

print("Attachments have been downloaded and zipped to", download_folder)
Script to run a local web server
After you have all the attachments on your local machine, you will need to create a local web server to provide the attachments so Jira Cloud can reach it.
To run the script you need to install the following libraries:
pip install flask
The path to the attachments folders needs to be set as the same one provided in the first script, in my case: C:\\Users\\rodol\\Documents\\projects\\import-csv\\attachments
from flask import Flask, send_from_directory
app = Flask(__name__)

@app.route('/download/<path:file_path>')
def download_file(file_path):
    directory, filename = file_path.rsplit('/', 1)
    return send_from_directory("C:\\Users\\rodol\\Documents\\projects\\import-csv\\attachments\\"+directory, filename, as_attachment=True)

if __name__ == '__main__':
    app.run(debug=True)
You can run this server like any python script and you will have the following in your prompt:

Expose your local server to the internet
So you have a LOCAL server providing the attachments but you need them to be exposed to the internet. To do that we will use Ngrok.
You can download the little application in https://ngrok.com/
After configuring ngrok with your credentials (explained on the website) you just need to run the command:
ngrok http 5000
5000 is the port of your local application, as shown in the screenshot: Running on http:127.0.0.1:5000
When you run ngrok you will see the following:
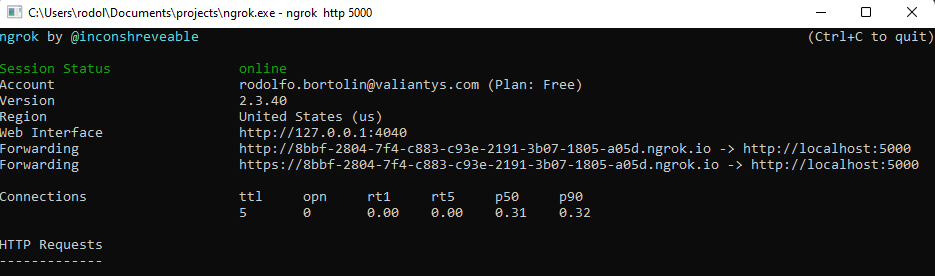
So you now have a web server that can be reached anywhere on the internet.
To download an attachment, you need to go to the following address (ngrok URL provided + folder + file):
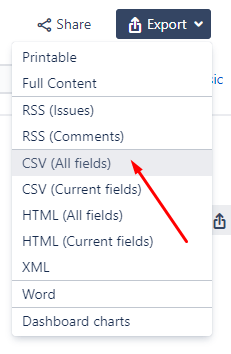
https://8bbf-2804-7f4-c883-c93e-2191-3b07-1805-a05d.ngrok.io/download/10000/IssueTypes.pngExport the CSV
The customer has several custom fields and doesn’t want to import all of them into the cloud. So we create a filter with the same JQL provided in the first script “project in (TEST, TAT) ORDER BY key ASC“, and download the CSV with the fields but without the comments and attachments.
Having an ORDER BY in the JQL it’s important. You will have to ensure that the order is intact because you will need to merge the “fields csv” with “attachments and comments csv” as explained in the following lines.
We were able to download the fields that we want selecting a few columns but to export comments and attachments, it’s necessary to export ALL FIELDS of the export functionality.
Fixing the usernames in “users” field
For the CSV exported by the default Jira Export functionality, all fields of type User Picker (assignee, reporter, etc) are usernames instead of emails, use the script bellow to change the values to their correspoding emails:
import csv
import pandas as pd

# Read the Excel file containing the replacement values
df = pd.read_excel(r"C:\Users\rodol\Documents\projects\import-csv\users-dj.xlsx", sheet_name='users')
# Create a dictionary of replacement values
replacement_values = dict(zip(df['A'], df['B']))

# Open the CSV file for reading
with open('input.csv', 'r', encoding='utf-8') as in_file:
    # Create a new CSV file for writing
    with open('input-modified.csv', 'w', encoding='utf-8') as out_file:
        # Create a CSV reader and writer
        reader = csv.reader(in_file)
        writer = csv.writer(out_file)
        # Iterate through the rows of the CSV file
        for row in reader:
            # Replace the values in the row
            new_row = [replacement_values.get(x, x) for x in row]
            # Write the modified row to the new CSV file
            writer.writerow(new_row)

df = pd.read_csv('input-modified.csv', encoding='utf-8')
df.to_csv('output.csv', index=False)
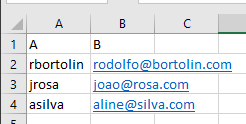
You will need an excel file exported from the database with all the usernames in Column A and their emails in column named B, the name of the file is users-dj.xlsx
SELECT user_name, email_address
FROM cwd_user
WHERE email_address IS NOT NULL
AND email_address ~ '^[A-Za-z0-9._%-]+@[A-Za-z0-9.-]+[.][A-Za-z]+$'
The file should look like this. Rename the sheet to users.
The Output will be a output.csv their names fixed.
Problem with Jira Export → ALL FIELDS functionallity
The export was not working because of the number of custom fields. So I built a Jira plugin (for Jira > 8) witch is a Servlet that will download the csv with the same template that Jira does, but with a few more functionalities.
- I changed the comment author to be exported with the email, not the username, Jira Cloud expects the email instead of usernames.
- You can send the base URL of the attachments as a prefix parameter (here you will provide the base URL of your ngrok application)
- You can send the JQL as a jql parameter
- You can send the default email for the users that have no email with the email parameter
Here is the code of the Java servet
import java.io.IOException;
import java.io.PrintWriter;
import java.text.SimpleDateFormat;
import java.util.List;

import javax.servlet.ServletException;
import javax.servlet.http.HttpServlet;
import javax.servlet.http.HttpServletRequest;
import javax.servlet.http.HttpServletResponse;

import com.atlassian.jira.bc.issue.search.SearchService;
import com.atlassian.jira.component.ComponentAccessor;
import com.atlassian.jira.issue.Issue;
import com.atlassian.jira.issue.attachment.Attachment;
import com.atlassian.jira.issue.comments.Comment;
import com.atlassian.jira.issue.search.SearchException;
import com.atlassian.jira.jql.parser.JqlParseException;
import com.atlassian.jira.jql.parser.JqlQueryParser;
import com.atlassian.jira.user.ApplicationUser;
import com.atlassian.jira.web.bean.PagerFilter;
import com.atlassian.query.Query;

public class CommentDownloadServlet extends HttpServlet {

    private static final long serialVersionUID = 1L;
    private String email;
    private String jql;
    private String prefix;

    @Override
    protected void doGet(HttpServletRequest req, HttpServletResponse resp) throws ServletException, IOException {

        jql = req.getParameter("jql");
        email = req.getParameter("email");
        prefix = req.getParameter("prefix");

        List<Issue> issues = null;
        Query query = null;

        JqlQueryParser jqlQueryParser = ComponentAccessor.getComponent(JqlQueryParser.class);


        try {
            query = jqlQueryParser.parseQuery(jql);

            SearchService searchService = ComponentAccessor.getComponent(SearchService.class);
            ApplicationUser user = ComponentAccessor.getJiraAuthenticationContext().getLoggedInUser();

            issues = searchService.search(user, query, PagerFilter.getUnlimitedFilter()).getResults();

        } catch (JqlParseException e) {
            e.printStackTrace();
        } catch (SearchException e) {
            e.printStackTrace();
        }

        resp.setContentType("text/csv; charset=UTF-8");
        resp.addHeader("Content-Type", "text/csv; charset=UTF-8");
        resp.setHeader("Content-Disposition", "attachment; filename=comments.csv");

        String baseUrl = ComponentAccessor.getApplicationProperties().getString("jira.baseurl");

        PrintWriter writer = resp.getWriter();
        int maxCommentCount = 0;
        int maxAttachmentCount = 0;
        if (issues != null) {
            for (Issue issue : issues) {
                maxCommentCount = Math.max(maxCommentCount, ComponentAccessor.getCommentManager().getComments(issue).size());
            }
            for (Issue issue : issues) {
                maxAttachmentCount = Math.max(maxAttachmentCount, ComponentAccessor.getAttachmentManager().getAttachments(issue).size());
            }
            writer.append("Issue Key,");
            for (int i = 0; i < maxCommentCount; i++) {
                writer.append("Comment");
                if (i != maxCommentCount - 1) {
                    writer.append(",");
                }
            }
            writer.append(",");
            for (int i = 0; i < maxAttachmentCount; i++) {
                writer.append("Attachment");
                if (i != maxAttachmentCount - 1) {
                    writer.append(",");
                }
            }
            writer.append("\n");
            for (Issue issue : issues) {
                List<Comment> comments = ComponentAccessor.getCommentManager().getComments(issue);
                writer.append(issue.getKey() + ",");
                for (int i = 0; i < maxCommentCount; i++) {
                    if (i < comments.size()) {
                        Comment comment = comments.get(i);
                        SimpleDateFormat sdf = new SimpleDateFormat("MM/dd/yyyy h:mm a");
                        String date = sdf.format(comment.getCreated());

                        String commentFixed = comment.getBody().replace("\"", "\"\"");
                        if(comment.getAuthorApplicationUser().getEmailAddress() == null || comment.getAuthorApplicationUser().getEmailAddress().equalsIgnoreCase("")) {
                            email = req.getParameter("email").toString();
                        } else {
                            email = comment.getAuthorApplicationUser().getEmailAddress();
                        }

                        writer.append("\"" + date + "; " + comment.getAuthorApplicationUser().getEmailAddress() + ";" + commentFixed + "\"");
                    }
                    if (i != maxCommentCount - 1) {
                        writer.append(",");
                    }
                }
                writer.append(",");
                List<Attachment> attachments = ComponentAccessor.getAttachmentManager().getAttachments(issue);
                for (int i = 0; i < maxAttachmentCount; i++) {
                    if (i < attachments.size()) {
                        Attachment attachment = attachments.get(i);

                        String base = prefix == null ? baseUrl+"/secure/attachment/" : prefix.trim()+"/download/";

                        writer.append("\""+ base + attachment.getId() + "/" + attachment.getFilename() + "\"");
                    }
                    if (i != maxAttachmentCount - 1) {
                        writer.append(",");
                    }
                }
                writer.append("\n");
            }
        }

        writer.flush();
        writer.close();
    }
}
After install the plugin you will download the CSV for the comments and attachments using the following URL
http://<jira_base_URL>/plugins/servlet/download-comments?prefix=https://8bbf-2804-7f4-c883-c93e-2191-3b07-1805-a05d.ngrok.io&email=invalid@domain.com&jql=project in (TEST, TAT) ORDER BY key ASC
It will give you something like this:
| Issue Key | Comment | Comment | Comment | Attachment | Attachment |
| TAT-1 | 01/24/2023 9:42 AM; rodolfo.bortolin@valiantys.com;comment 1 | 01/24/2023 9:42 AM; rodolfo.bortolin@bortolin.com;comment 2 | 01/24/2023 9:42 AM; rodolfo.bortolin@bortolin.com;comment 3 | https://8bbf-2804-7f4-c883-c93e-2191-3b07-1805-a05d.ngrok.io/download/10000/IssueTypes.png | https://8bbf-2804-7f4-c883-c93e-2191-3b07-1805-a05d.ngrok.io/download/10014/i.png |
Merge the csv previously exported with the columns that you chose with the one exported from the plugin and voilà!
Now you can import the CSV and Jira Cloud will be able to reach the attachments in your local machine through ngrok!
