Introduction
Building a comprehensive knowledge base is a significant challenge. Teams are often too busy with day-to-day tasks, leading to a lack of proper documentation and knowledge sharing. However, with the right tools and automation, this obstacle can be efficiently overcome. You can do this by automating the creation of Confluence pages and you can use macros and information from resolved incident tickets.
This blog post introduces a practical example of how Automation for Jira can be used to streamline the process of knowledge base creation. It’s important to note that this is just an example, you can adapt the fields and layouts to fit your specific needs.
Step 1: Setting Up in Jira Service Management
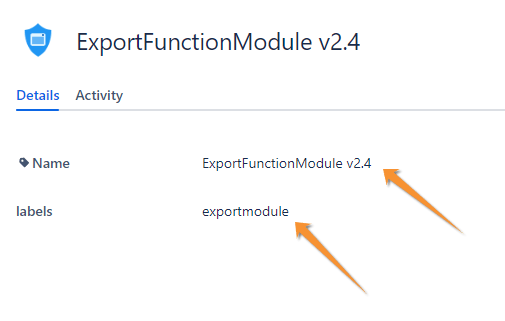
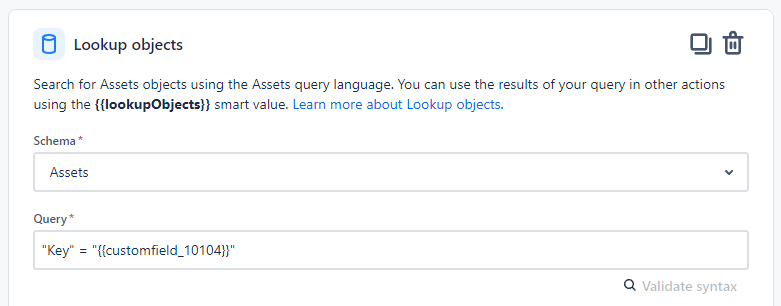
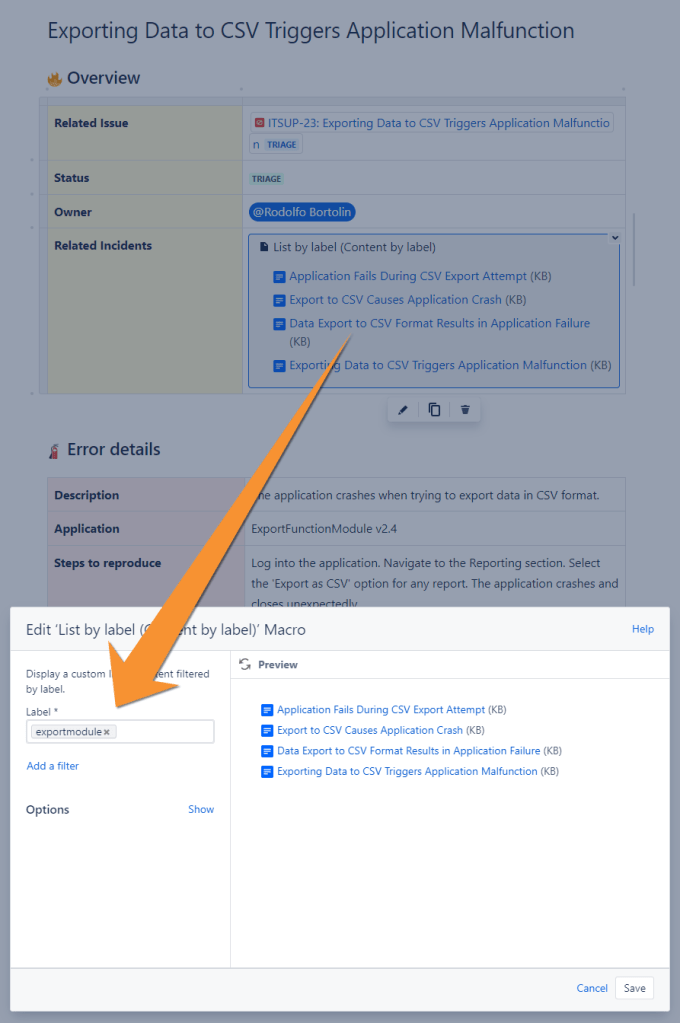
Here I will use information from Jira Service Management’s Assets functionality. You need to create an object named ‘Applications.’ This application should contain an attribute called ‘labels,’ which plays a crucial role. These labels are essential for the ‘list by label’ macro in Confluence, allowing you to showcase related knowledge bases (KBs) in the future.
This is the custom field configuration and the ID that will be used for the lookup objects later:
- Name Primary configuration item
- Filter scope (AQL): objecttype = Applications
- Custom Field ID: 10104
Step 2: Jira Issue and Designing the Payload for Confluence
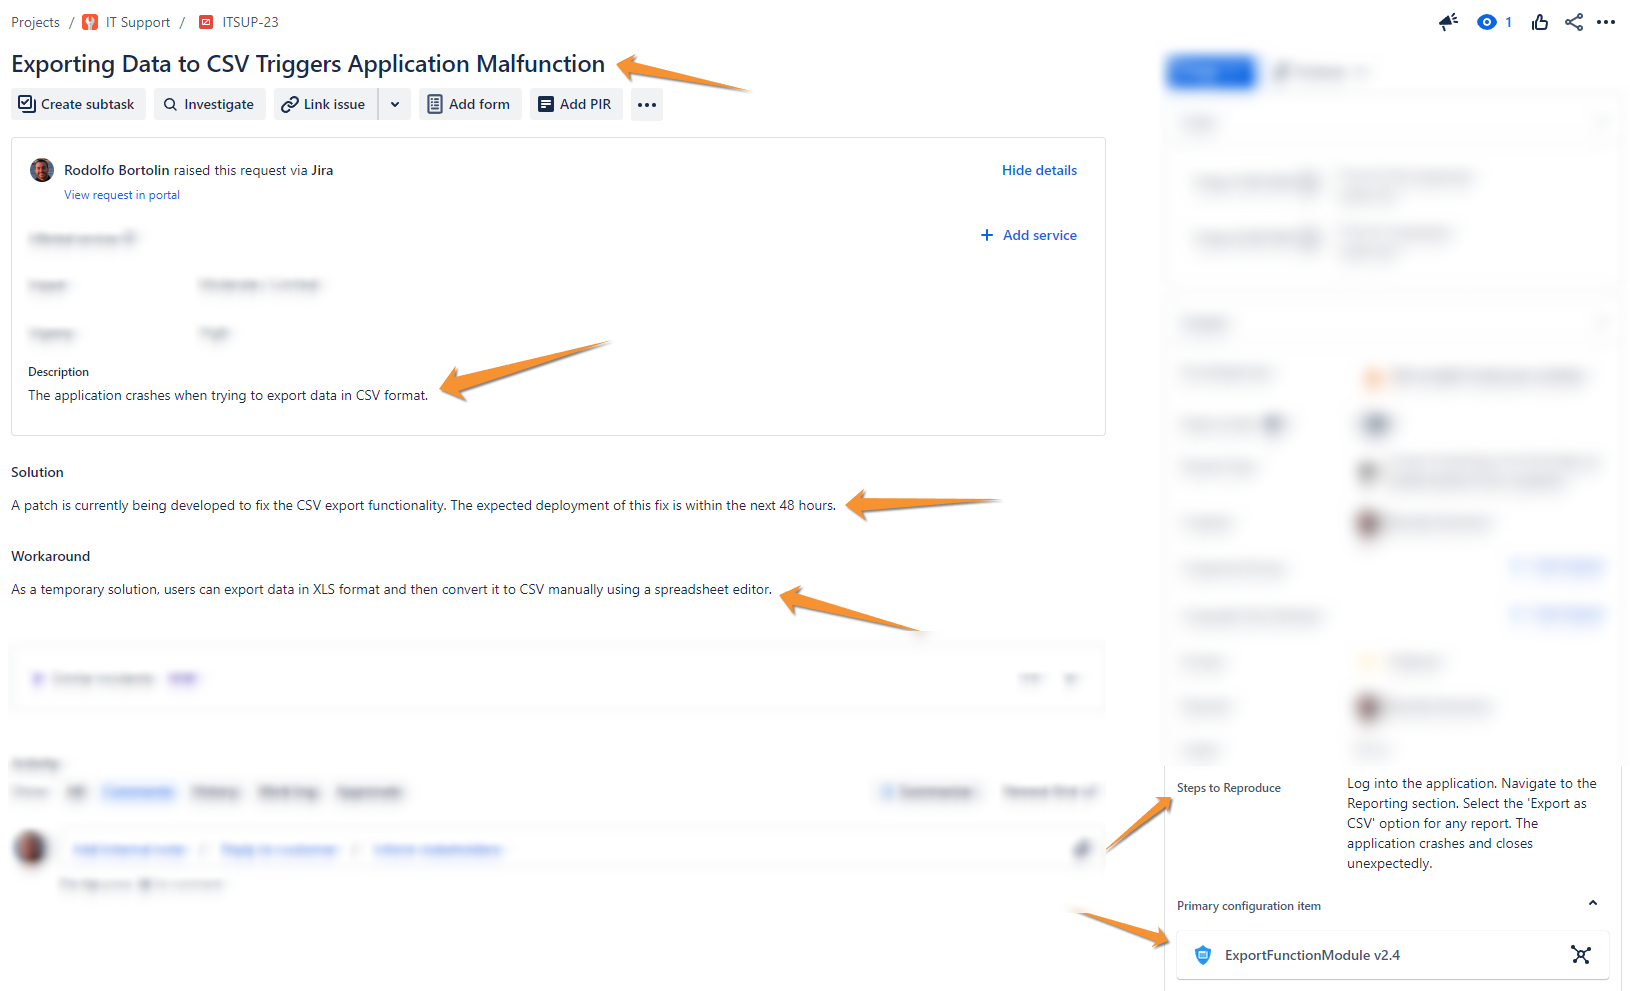
Jira Incident
In this example, several values from the Jira issue will be copied into the KB. As shown in the picture below:
Confluence Template
The easiest starting point for constructing the payload to be sent to Confluence by Automation for Jira is to first create the desired template in Confluence.
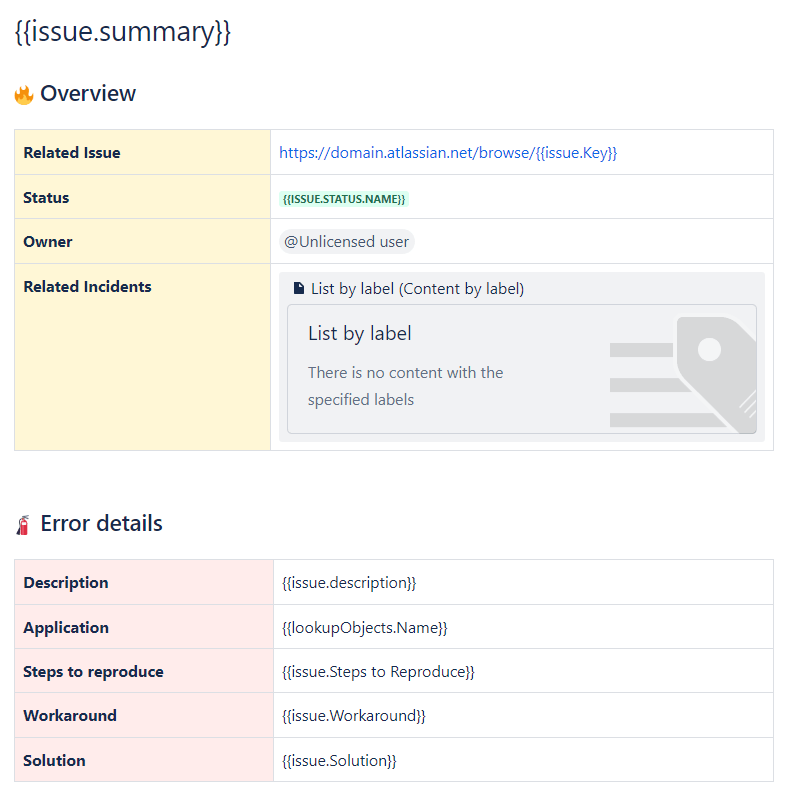
After setting up your template, navigate to [...] -> Advanced details -> View Storage Format to copy the Storage Format. This format will be used to structure the content sent from Jira to Confluence.
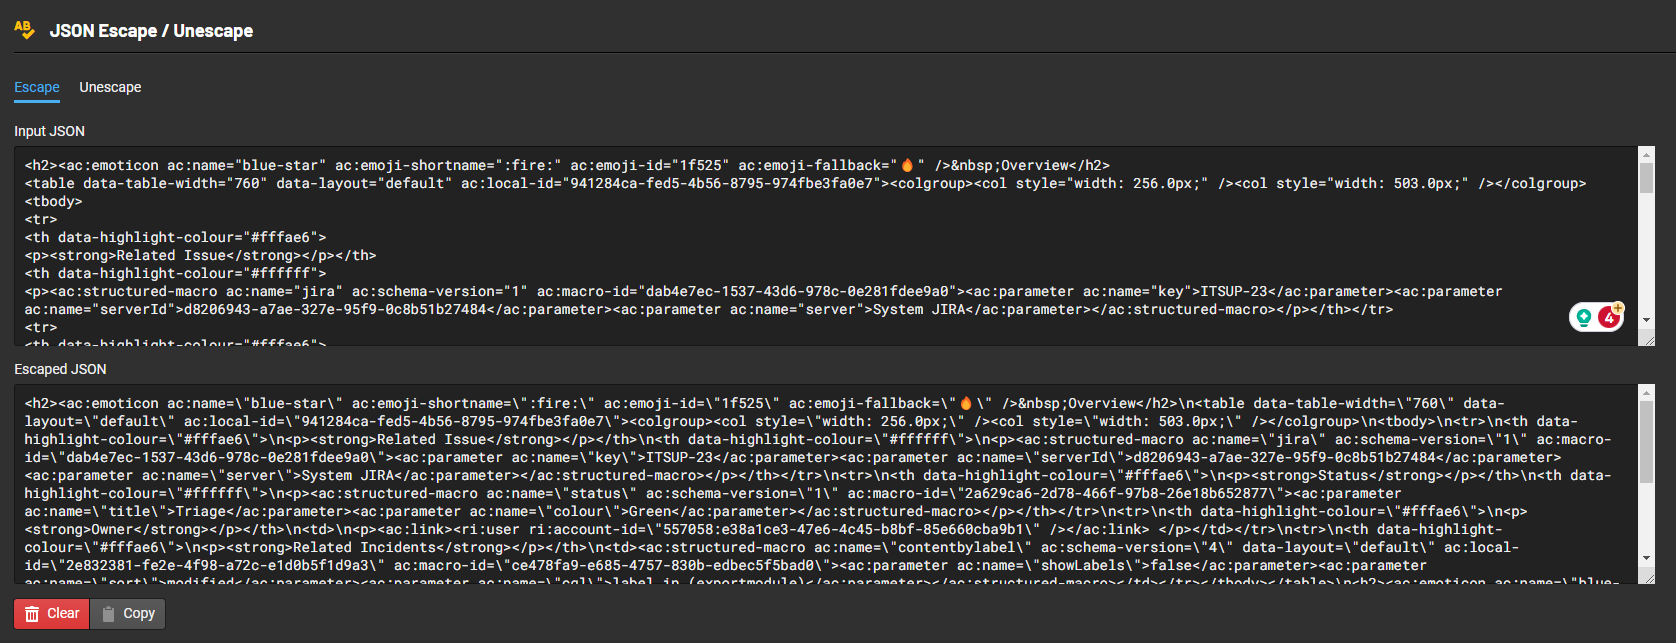
Some characters will have to be scaped in order to work in the JSON that you will send through Automation for Jira, the easiest way to do this is to use an online tool that does this job for you, I found this site:
Step 3: Transferring Data from Jira to Confluence
Make sure all the values inside the payload have the Smart Values from Automation for Jira.
- Summary: {{issue.summary}}
- Issue Key present in the macro Jira Issue: {{issue.Key}}
- Status: {{issue.status.name}}
- Owner present in the macro User: {{issue.assignee.accountId}}
- Label present in the List By Label macro: {{lookupObjects.labels}}
- Description: {{issue.description}}
- Application Name: {{lookupObjects.Name}}
- Workaround: {{issue.Workaround}}
- Steps to Reproduce: {{issue.Steps to Reproduce}}
- Solution: {{issue.Solution}}
Step 4: The Automation Rule
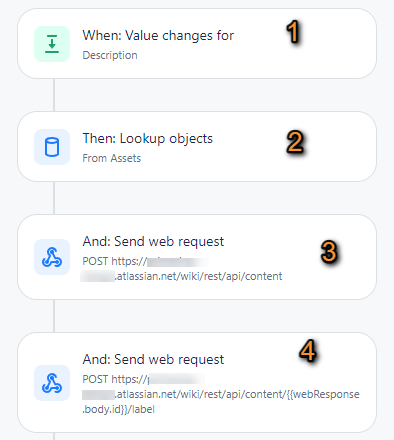
1. Create a trigger that best suits your needs, here I put when the Incident is moved to Resolved.
2. Create a lookup to find the record in the “Primary configuration item” field, for which the configuration and ID have already been provided earlier.
Two WebRequests are essential in this process:
3. The first WebRequest is responsible for creating the page in Confluence. This is where the payload, structured in the previous step, is sent to Confluence to generate a new page.
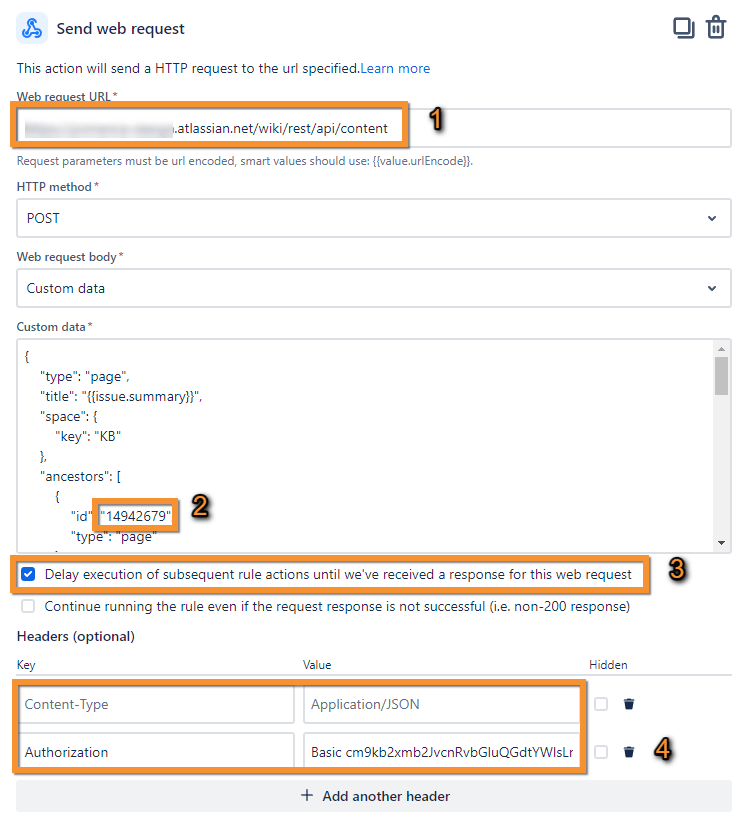
- The REST API Endpoint to create the page in Confluence
- The parent page ID in the Confluence structure
- Don’t forget to check the box for Confluence to wait for a response from Confluence to proceed, without this it won’t work.
- Don’t forget to enter the Basic Authentication credentials of a system user so that it can create the page, and mark the Hidden option to conceal this value later.
Payload:
{
"type": "page",
"title": "{{issue.summary}}",
"space": {
"key": "KB"
},
"ancestors": [
{
"id": "14942679",
"type": "page"
}
],
"body": {
"storage": {
"value": "<h2><ac:emoticon ac:name=\"blue-star\" ac:emoji-shortname=\":fire:\" ac:emoji-id=\"1f525\" ac:emoji-fallback=\"🔥\" /> Overview</h2><table data-table-width=\"760\" data-layout=\"default\" ac:local-id=\"941284ca-fed5-4b56-8795-974fbe3fa0e7\"><colgroup><col style=\"width: 256.0px;\" /><col style=\"width: 503.0px;\" /></colgroup><tbody><tr><th data-highlight-colour=\"#fffae6\"><p><strong>Related Issue</strong></p></th><th data-highlight-colour=\"#ffffff\"><p><ac:structured-macro ac:name=\"jira\" ac:schema-version=\"1\" ac:macro-id=\"587cc5b9-67e3-4f54-81d1-68c7cd7923a7\"><ac:parameter ac:name=\"key\">{{issue.Key}}</ac:parameter><ac:parameter ac:name=\"serverId\">d8206943-a7ae-327e-95f9-0c8b51b27484</ac:parameter><ac:parameter ac:name=\"server\">System JIRA</ac:parameter></ac:structured-macro></p></th></tr><tr><th data-highlight-colour=\"#fffae6\"><p><strong>Status</strong></p></th><th data-highlight-colour=\"#ffffff\"><p><ac:structured-macro ac:name=\"status\" ac:schema-version=\"1\" ac:macro-id=\"2a629ca6-2d78-466f-97b8-26e18b652877\"><ac:parameter ac:name=\"title\">{{issue.status.name}}</ac:parameter><ac:parameter ac:name=\"colour\">Green</ac:parameter></ac:structured-macro></p></th></tr><tr><th data-highlight-colour=\"#fffae6\"><p><strong>Owner</strong></p></th><td><p><ac:link><ri:user ri:account-id=\"{{issue.assignee.accountId}}\" /></ac:link> </p></td></tr><tr><th data-highlight-colour=\"#fffae6\"><p><strong>Related Incidents</strong></p></th><td><ac:structured-macro ac:name=\"contentbylabel\" ac:schema-version=\"4\" data-layout=\"default\" ac:macro-id=\"ce478fa9-e685-4757-830b-edbec5f5bad0\"><ac:parameter ac:name=\"cql\">label in ({{lookupObjects.labels}})</ac:parameter><ac:parameter ac:name=\"showLabels\">false</ac:parameter><ac:parameter ac:name=\"sort\">modified</ac:parameter></ac:structured-macro></td></tr></tbody></table><h2><ac:emoticon ac:name=\"blue-star\" ac:emoji-shortname=\":fire_extinguisher:\" ac:emoji-id=\"1f9ef\" ac:emoji-fallback=\"🧯\" /> Error details</h2><table data-table-width=\"760\" data-layout=\"default\" ac:local-id=\"47d61b3f-0248-4acc-81c0-133518c783d9\"><colgroup><col style=\"width: 259.0px;\" /><col style=\"width: 500.0px;\" /></colgroup><tbody><tr><th data-highlight-colour=\"#ffebe6\"><p><strong>Description</strong></p></th><th data-highlight-colour=\"#ffffff\"><p>{{issue.description}}</p></th></tr><tr><th data-highlight-colour=\"#ffebe6\"><p><strong>Application</strong></p></th><td><p>{{lookupObjects.Name}}</p></td></tr><tr><th data-highlight-colour=\"#ffebe6\"><p><strong>Steps to reproduce</strong></p></th><td><p>{{issue.Steps to Reproduce}}</p></td></tr><tr><th data-highlight-colour=\"#ffebe6\"><p><strong>Workaround</strong></p></th><td><p>{{issue.Workaround}}</p></td></tr><tr><th data-highlight-colour=\"#ffebe6\"><p><strong>Solution</strong></p></th><td><p>{{issue.Solution}}</p></td></tr></tbody></table>",
"representation": "storage"
}
}
}
4. The second WebRequest is used to record the application label on the newly created Confluence page. This label is crucial for linking the page to related KBs and ensuring a structured and interconnected knowledge base.
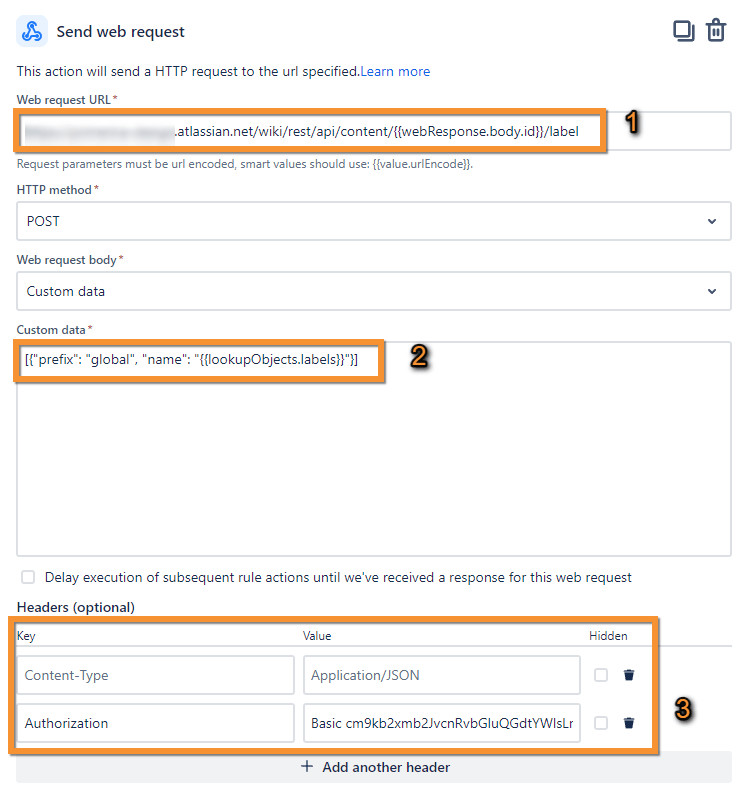
- The REST API Endpoint to create labels in a page in Confluence
- The Payload sending the Application label into the Confluence page
- Access credentials
Payload:
[{"prefix": "global", "name": "{{lookupObjects.labels}}"}]
Final Result
After everything is ready, voilà! You have created a beautiful page using macros without the slightest effort for your service desk agents.
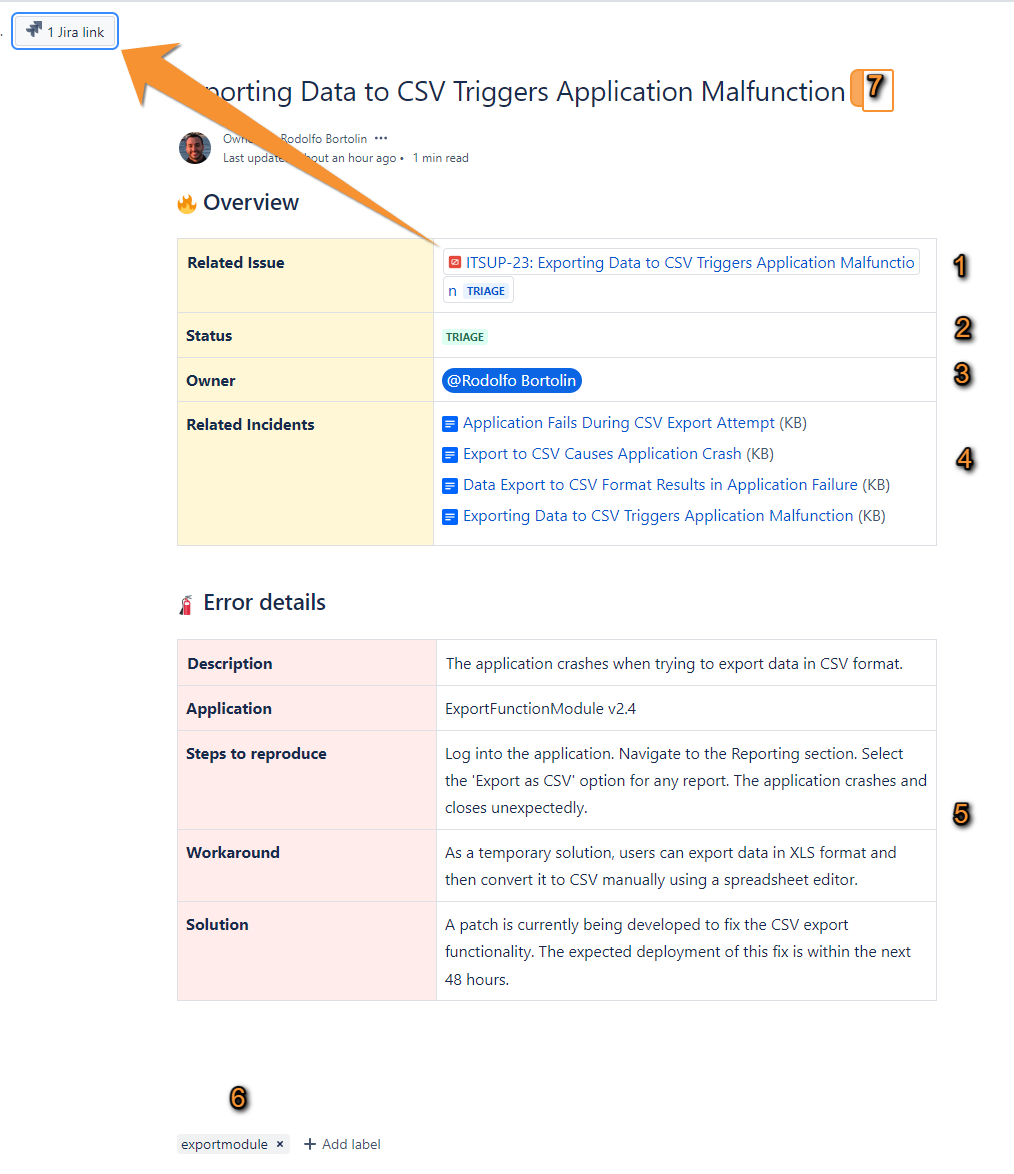
- Macro that inserts the Issue Key and links the page with the specific Issue
- Status macro displaying the Issue’s status in Jira.
- The Assignee of the issue.
- Macro for pages with related labels.
- Some additional fields that came from Jira
- Application label added, which came from the Application attribute
- Page title (summary of the issue)
Please note that in the macro configuration, the label for the Application is there.
And of course, the backlink that is automatically generated within the Issue.

Great, I think that’s it! I hope this article has been useful for you. Remember, I added some things here to give the article a special touch, like integration with Assets and some macros. Obviously, you can and should modify it to better suit your needs.
Until next time!
