
Managing ticket assignments efficiently in Jira Service Management (JSM) can be challenging, especially when contending with a high volume of issues and diverse team capabilities. Manual assignment is not only time-consuming but also prone to human errors, which can lead to delays in issue resolution and decreased customer satisfaction.
To solve this problem, I’ve implemented an automation within Jira Service Management (JSM) that leverages the capabilities of OpenAI, similar to the post Enhancing Jira Automation with AI: Smart Handling of Issue Comments, but with a little more spice . This automation not only intelligently routes tickets to the most appropriate teams based on their expertise but also automatically updates the “Impact” and “Incident Type” fields. This refined approach reduces the workload on staff, minimizes human errors, and enhances reporting capabilities. By ensuring that tickets are processed efficiently and accurately, we improve overall response times and deliver better service to customers.
If you want to take a peek at the final result before diving into all the technical material in this post, scroll down to “The Result” section, and see the final outcome before trying to understand the automation rule, it will help you understand what’s being built!
How To
The Asset
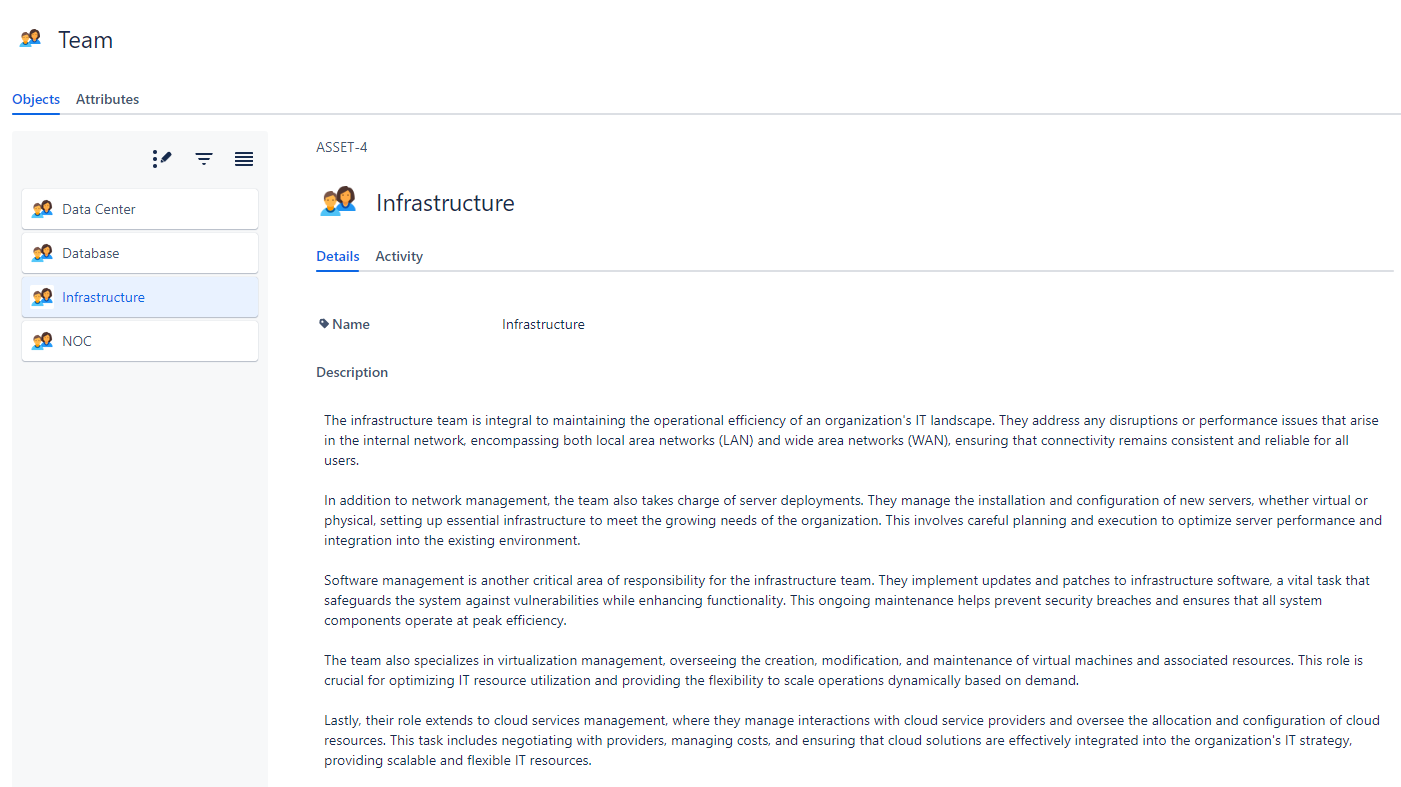
To fully leverage our AI automation for ticket assignments, it’s essential to have our teams within Jira Service Management (JSM) as assets, this is a common approach in a lot of JSM implementations nowadays. This setup involves creating an object in JSM Assets called “Teams” and adding an attribute named “Description.” Here’s how you can do this:
Creating a “Teams” Object:
- Navigate to JSM Assets: In your Jira Service Management project, go to the ‘Assets’ section.
- Add a New Object Type: Click on the ‘Create’ button and select ‘Object Type.’ Name this object type “Teams.”
- Define Attributes: Add a key attribute called “Description” of type Text area”
- Fill in Details: Enter a description for each team in the “Description” attribute. This should detail the team’s expertise, the kind of tickets they are suited for, and any other relevant information that will inform the AI’s ticket routing decisions.
Creating the Custom Fields
Here are the custom fields you should set up as select lists:
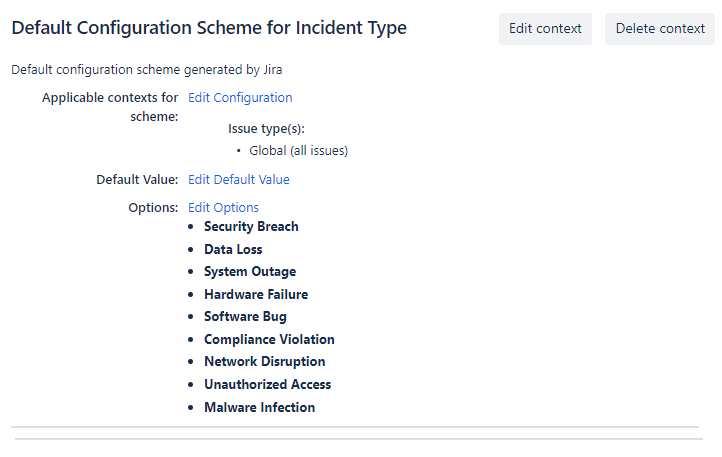
- Impact: The “Impact” custom field is used to evaluate and record the potential consequences of an incident on various aspects of the business.

- Incident Type: The “Incident Type” custom field is critical for classifying the nature of each issue that arises.
The Automation Rule
Here is how the automation is structured. It seems large, but several of these actions are just logs to better understand what’s happening under the hood.
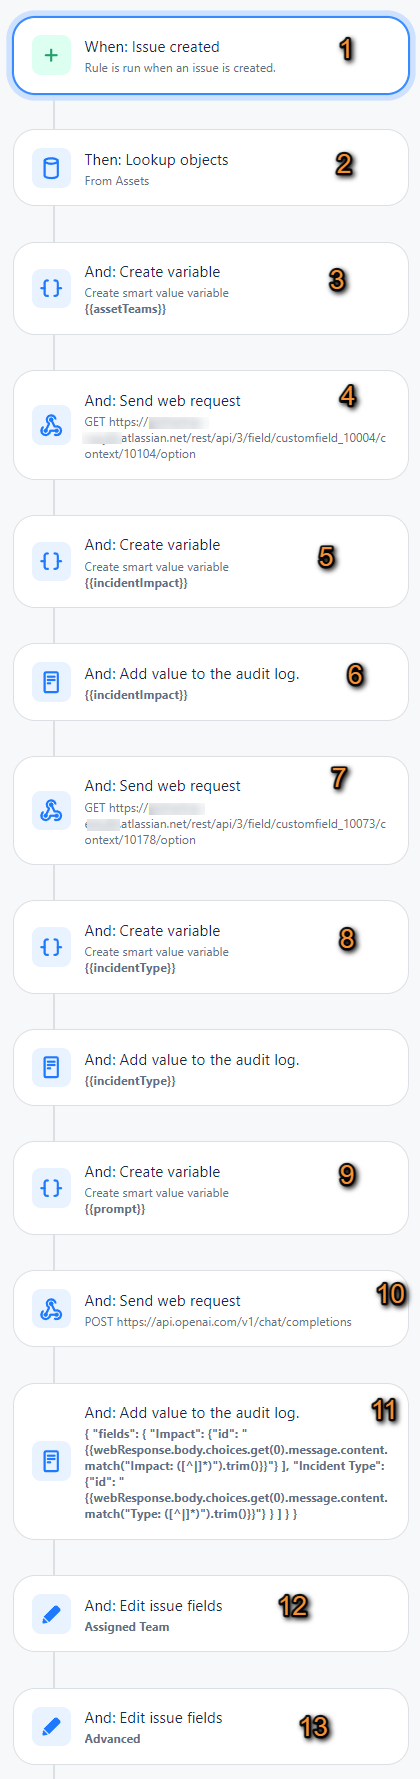
- 1 – When Issue Created: The rule is activated when a issue is created in Jira (modify this as you need, you may want to have a condition to restrict the rule to run on specific issue types, for example)
- 2 – Lookup Objects: The system searches for all teams listed within your asset management system. This is the first step in identifying potential assignees for the ticket based on team capabilities and functions: AQL: objectType = Team
- 3 – Create Variable
{{assetTeams}}: This variable is crafted using smart values to compile a list of teams, where each team’s name and description are formatted in a way that can be understood by OpenAI.
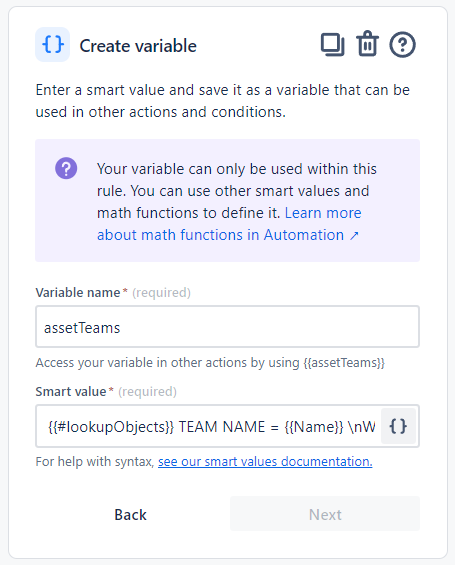
Smart value:
{{#lookupObjects}} TEAM NAME = {{Name}} \nWHAT THEY DO: \n {{Description}} \n\n {{/}}- 4 – Send Web Request (Impact Values): Makes a GET request to retrieve all possible values of the custom field “Impact” from the Jira instance.
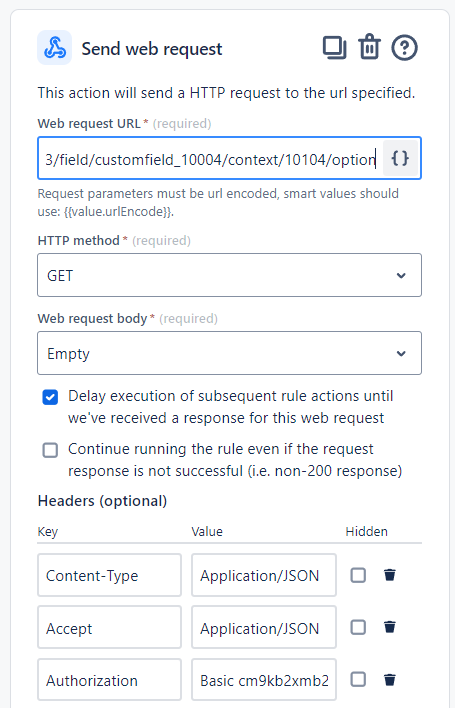
Web Request URL:
https://domain.atlassian.net/rest/api/3/field/customfield_10004/context/10104/option
Where customfield_10004 is the ID of the customfield and 10104 is the ID of the context (you can find them in the URL when you edit the customfield)
Lastly, the Authorization is your <email>:<your_token>encoded with Base64.
You can easily encode them here: https://www.base64encode.org/
- 5 – Create Variable
{{incidentImpact}}: Stores the values and IDs of the “Impact” field in a list for use in the OpenAI prompt.
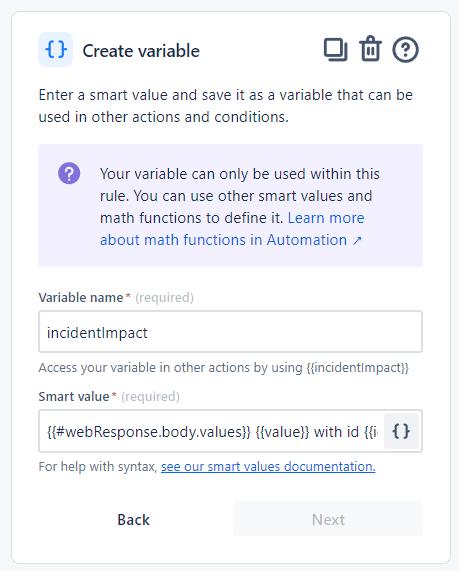
{{#webResponse.body.values}} {{value}} with id {{id}}, {{/}}- 6 – Log Action
{{incidentImpact}}: Logs the values of the “Impact” field in the audit log for transparency and tracking. - 7 – Send Web Request (Incident Type Values): Similarly to Impact Values, this retrieves all possible values of the “Incident Type” field from Jira.
- 8 – Create Variable
{{incidentType}}and Log Action: Follows the same pattern as the “Impact” steps but for the “Incident Type” field. - 9 – Create Variable
{{prompt}}: Sets up the prompt to be sent to OpenAI. It includes the list of teams, the issue summary, and description, along with the options for “Incident Type” and “Impact”. The prompt instructs OpenAI to respond with the team name and IDs for the “Incident Type” and “Impact” that are most suitable for the ticket.

Here is the Prompt to ChatGPT:
You are responsible for assigning a ticket to a team in this Service Desk. The list of teams is the following: \n\n {{assetTeams}} Please decide which team is better for the job, considering that the summary of the ticket is {{issue.fields.summary}} and the description of the ticket is {{issue.fields.description}}. Only answer with the team name, and NOTHING else (no quotes, not “Team = “, just (for example): NOC). Only choose from the teams provided to you, DO NOT make up teams. \n You also need to provide the Incident Type of the Incident based on these options {{incidentType}} \n You also need to provide the Impact of the Incident based on these options {{incidentImpact}} \n Your response should have this format, as a example: \n Team: the_team|Type: ID|Impact: ID| \n Make sure you give me only the ID (for example: 10112 and not Outage with id 10112
- 10 – Send Web Request to OpenAI: Submits the constructed prompt to OpenAI’s API for processing. It uses a deterministic setting (temperature: 0) to get consistent results from the AI.
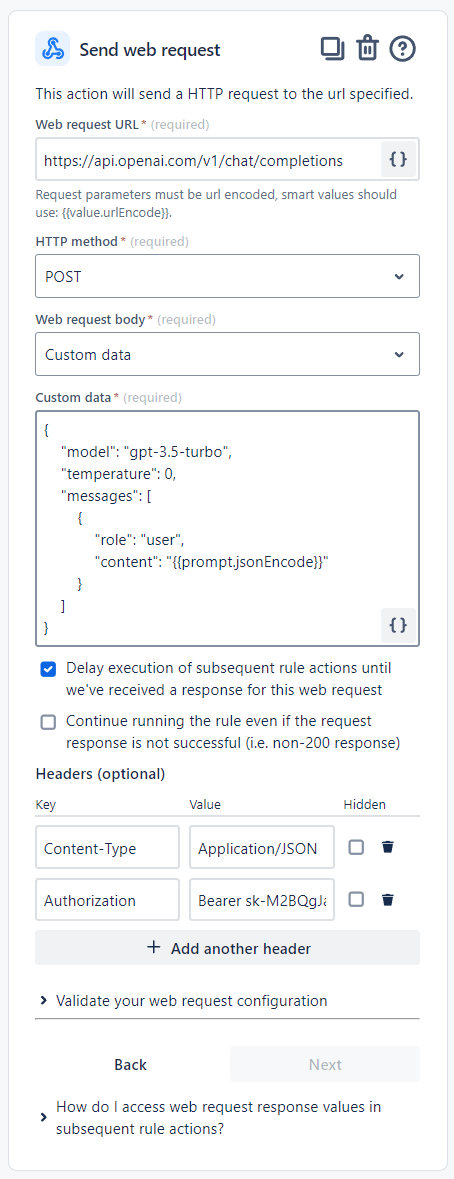
The Payload:
{
"model": "gpt-3.5-turbo",
"temperature": 0,
"messages": [
{
"role": "user",
"content": "{{prompt.jsonEncode}}"
}
]
}- 11 – Log Action (AI’s Response): The response from OpenAI is logged. The match and trim functions are used to extract the specific “Team”, “Type”, and “Impact” values from the response, which are then formatted to match Jira’s expected input format for updating fields.
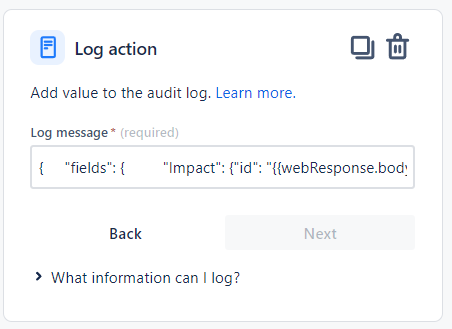
{ "fields": { "Impact": {"id": "{{webResponse.body.choices.get(0).message.content.match("Impact: ([^|])").trim()}}"} ], "Incident Type": {"id": "{{webResponse.body.choices.get(0).message.content.match("Type: ([^|])").trim()}}"} } ] } }- 12 – Edit Issue Fields (Assigned Team): Updates the “Assigned Team” field in the Jira ticket with the team name obtained from OpenAI’s response.

Name like "{{webResponse.body.choices.get(0).message.content.match("Team: ([^|]*)").trim()}}"- 13 – Edit Issue Fields (Impact and Incident Type): The final step is to update the Jira ticket with the “Impact” and “Incident Type” IDs that OpenAI has determined, using the response content processed by the match and trim functions.

The Payload:
{
"fields": {
"Impact": {"id": "{{webResponse.body.choices.get(0).message.content.match("Impact: ([^|])").trim()}}"}, "Incident Type": {"id": "{{webResponse.body.choices.get(0).message.content.match("Type: ([^|])").trim()}}"}
}
}
The Automation Log

The Result
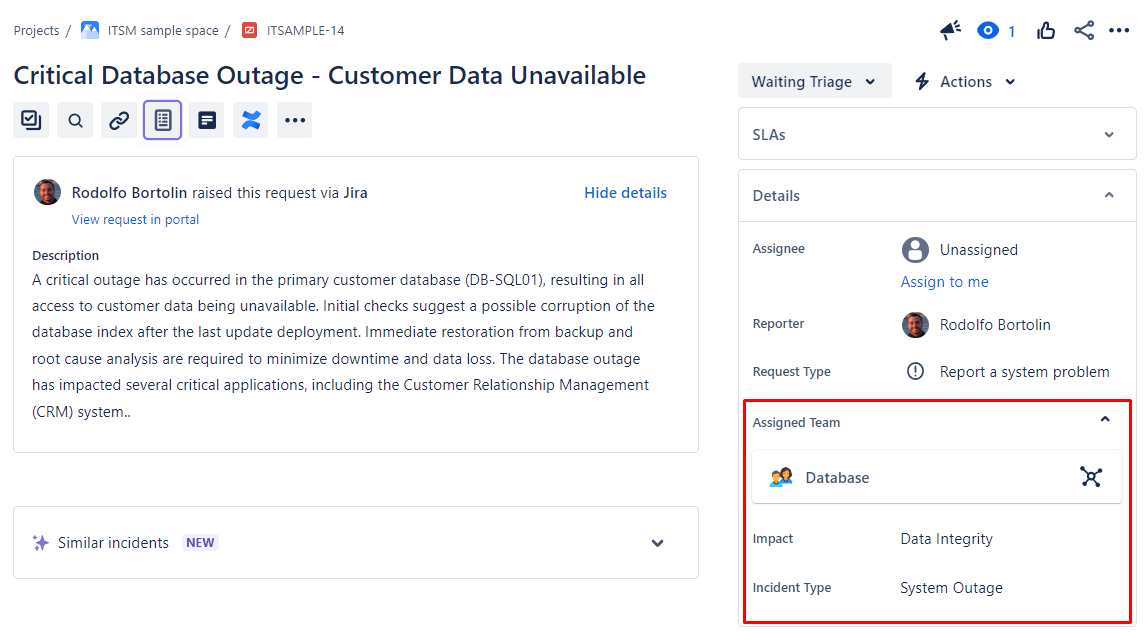
Example 1
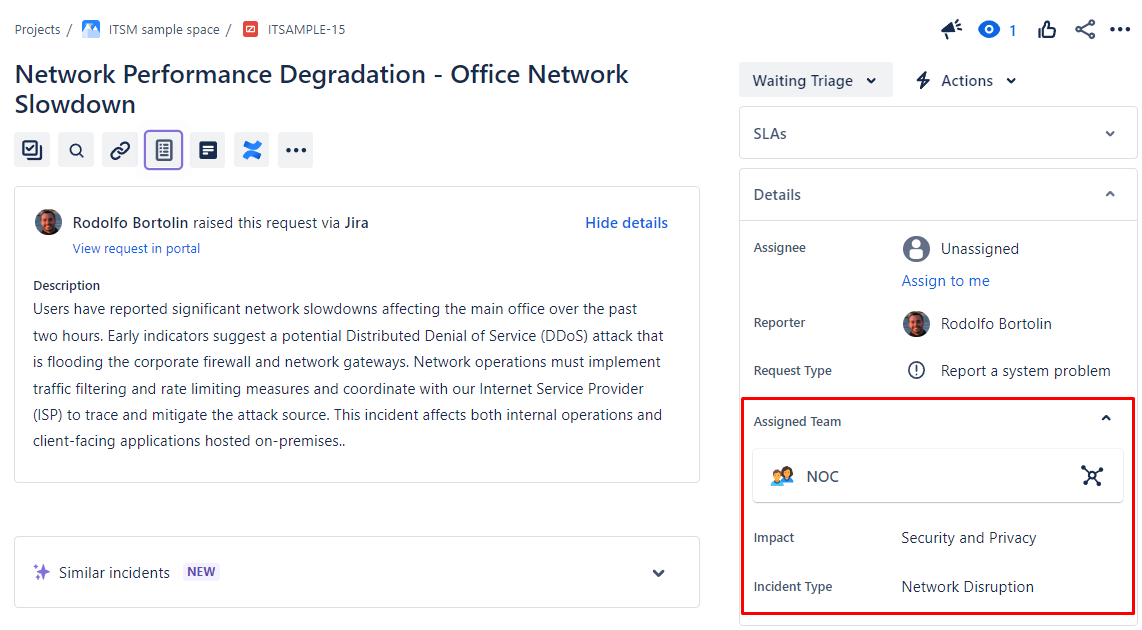
Example 2

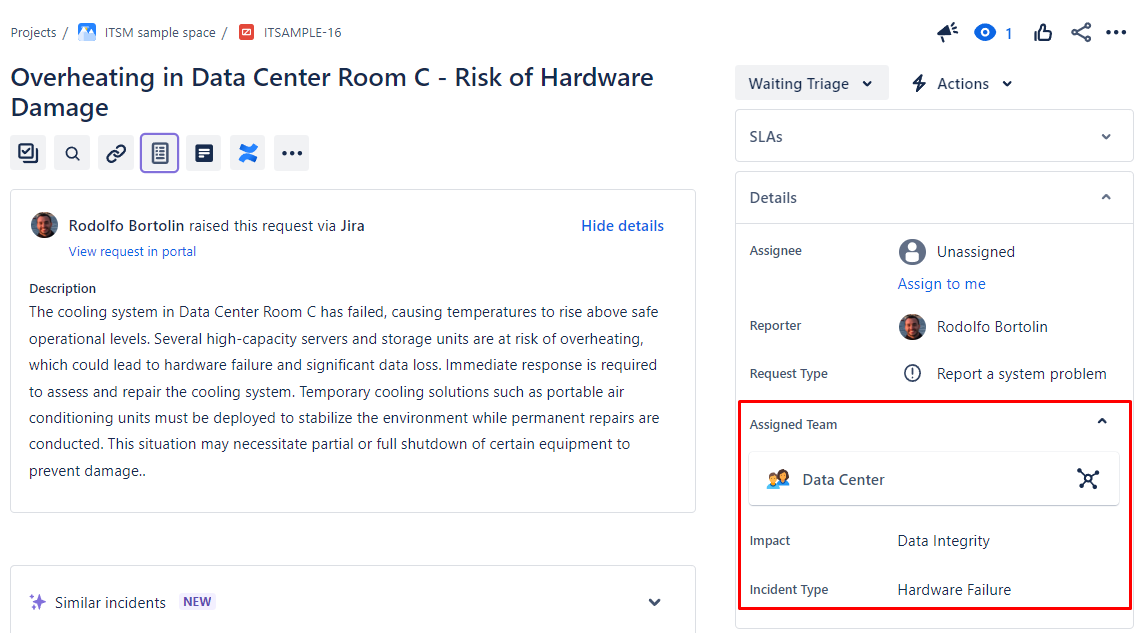
Example 3
Example 4
Conclusion
As you can see, the use of AI can bring significant efficiency gains to a company, in any area. By utilizing this model/example of automation, you can reconsider your entire service catalog, making it even more streamlined, as part of the work will be handled by AI. This approach not only optimizes the response times and accuracy of ticket assignments in JSM but also allows your team to focus on more complex and critical tasks, enhancing overall productivity and service quality. Adopting AI automation in your operations can be a transformative step towards a more agile and effective service management system.
