This post is tailored for those curious about the user-centric differences between Jira Data Center and Jira Cloud. Whether you’re navigating the transition from an on-premises instance to a cloud-based environment, or simply eager to understand the variances from a user’s viewpoint, you’re in the right place.
For reference, the Data Center images showcased are from version 9.12. And I’m assuming that your user is using English.
Navigation Bar
Main Tab
In Jira DC, the plugins are located together with other Jira functionalities such as Dashboards and Projects, and there is a direct link to your most accessed Boards.
In Jira Cloud, a button called “My Work” has been added, showing a summary of recently worked-on projects and some shortcuts like Issues you have worked on or viewed recently.
The link to all the apps is now located within the Apps tab, instead of being at the same level as Projects, Issues, etc.
❗Boards are now mandatorily associated with a project and are accessed when you enter the Project link. In other words, the menu to access all the boards has changed, and you need to access the Project to access its boards.
Tip: Here, what many people are doing is having an empty project called “Boards ABC” that contains boards from various projects, and within these boards, issues from multiple projects are included.
Jira Cloud

Jira DC

Search for Issues
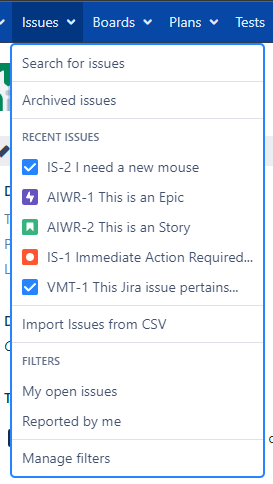
In Jira Data Center, under the Issues menu, you have access to your recent issues, as well as favorite filters, Archived Issues, and Search for Issues.
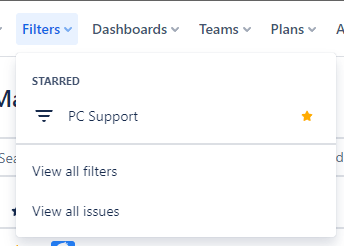
In Jira Cloud, this button has been renamed to Filters. It displays the filters you have marked as favorites (similar to how the Dashboards menu functions), and includes a link to perform an issue search under “View all issues”. Recent issues can still be accessed by clicking the search bar at the top of the page, making this information somewhat redundant in Jira Data Center.
| Cloud | DC |
|---|---|
 |  |
Quick Search
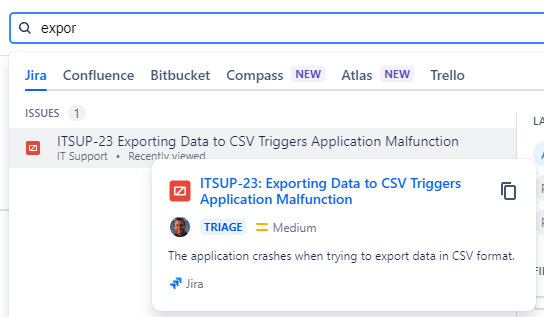
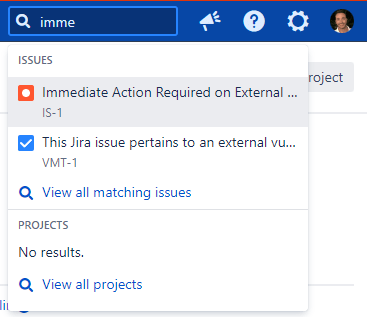
The quick search feature at the top of the page has undergone significant improvements in Jira Cloud. While in the Jira DC version, clicking opens your recent issues and projects, in Jira Cloud, you have access to other Atlassian tools and can perform simple searches using checkboxes, without needing to go to the real Jira search.
Especially for those migrating from Jira Data Center to Cloud, the link to all the boards you are accustomed to accessing can also be found here.
| Cloud |
|---|
 |
| DC |
 |
Continuing on this topic, in Jira Cloud when you hover the pointer over an issue, you will see an issue card that displays a button to copy the link, shows the priority, assignee, and description, whereas in the DC version, you will only see the complete summary.
| Cloud | DC |
|---|---|
 |  |
The Issue View
The layout might be where users will see the biggest difference between the two platforms. While the layout in Jira Data Center is an improvement on the layout from many years ago, featuring panels for description, details, people, dates, and time tracking, the layout of Jira Cloud has been completely redesigned. In Jira Cloud, the administrator has a bit more control over the arrangement of fields. They can show context fields, hide fields if they have no value, or even display fields in the description section, all through the Issue Layout feature.
The separate editing field no longer exists in Jira Cloud; all edits are made inline.

In Jira Cloud, you can also Pin fields to stay on the top of the page:


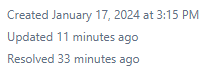
The fields for created, updated, and resolved no longer reside within the “Dates” panel. Instead, they are moved to the lower right corner of the issue screen, in a more discreet manner.
| Cloud | DC |
|---|---|
 |  |
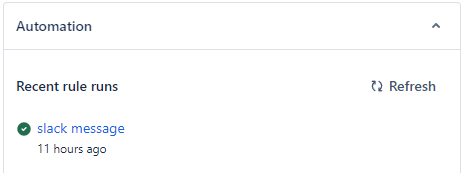
In Jira Cloud, you now have an exclusive panel for automations that have run for the issue, which can be very useful when you have several.
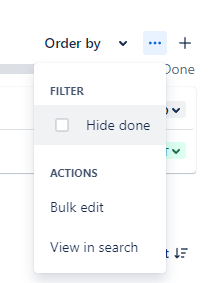
In Jira Data Center, actions within the issue are accessed through the “More” button, while in Jira Cloud they are more discreet and located at the top right corner of the page, represented by three dots next to the share icon.
| Cloud | DC |
|---|---|
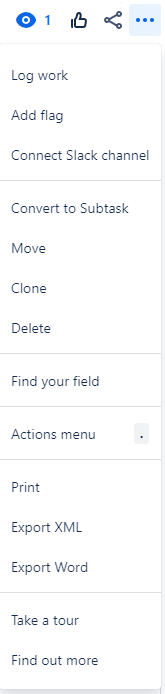 |  |
Note that the “Create subtask” option disappears from Jira Cloud and is relocated to a button within the main menu (refer to the provided screenshots below).
The main actions for an issue also change. While in Jira Data Center the menu is “static”, containing Edit, Add Comment, Assign, More, Transitions, in Jira Cloud more functionalities become available depending on the product and issue type you are using.
Jira DC

Jira Cloud
| Product | Issue Type | Buttons |
|---|---|---|
| Jira Software | Epic |  |
| Jira Software | Standard Task |  |
| Jira Service Management | Change |  |
| Jira Service Management | Incident |  |
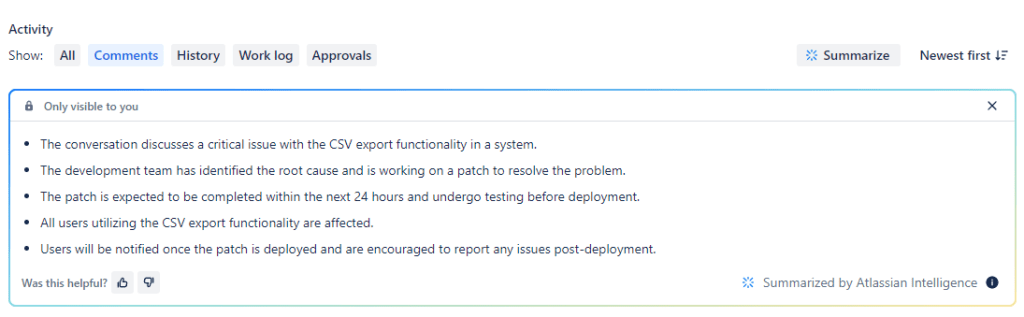
In Jira Cloud, the functionalities of Atlassian Intelligence have been added, creating summaries of the description and comments.
Search
The issue search page works in a very similar way in both versions, with almost the same buttons and functionalities. The only difference is that in Jira Cloud, the search will not show the total number of issues if this number exceeds 1000, which is a significant downside.

On the other hand, it is in Jira Cloud that you have the ability to export the results directly to Excel or Google Sheets.

List of Projects
Although the interface is similar, the way you filter project types is different. In Jira Cloud, filtering is done through select lists to choose projects from Jira Software, Jira Service Management, among others, and another select list to pick the project categories. You can also mark projects as favorites in this location.
In contrast, Jira DC has a sidebar menu for selecting categories and the type of project (Software, Business, etc.).
| Cloud |
|---|
 |
| DC |
 |
Worklogs
The interface for logging worked hours has also been redesigned. While in Jira DC you have multiple options regarding what to do with the remaining estimate, in Jira Cloud there is an input field for entering the remaining estimate, displaying a preview of the time tracking.
| Cloud | DC | |
| Where the Log Work is located | 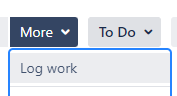 | 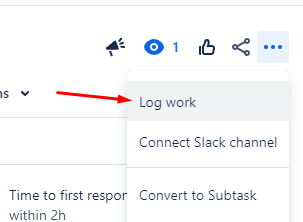 |
| Worklog screen | 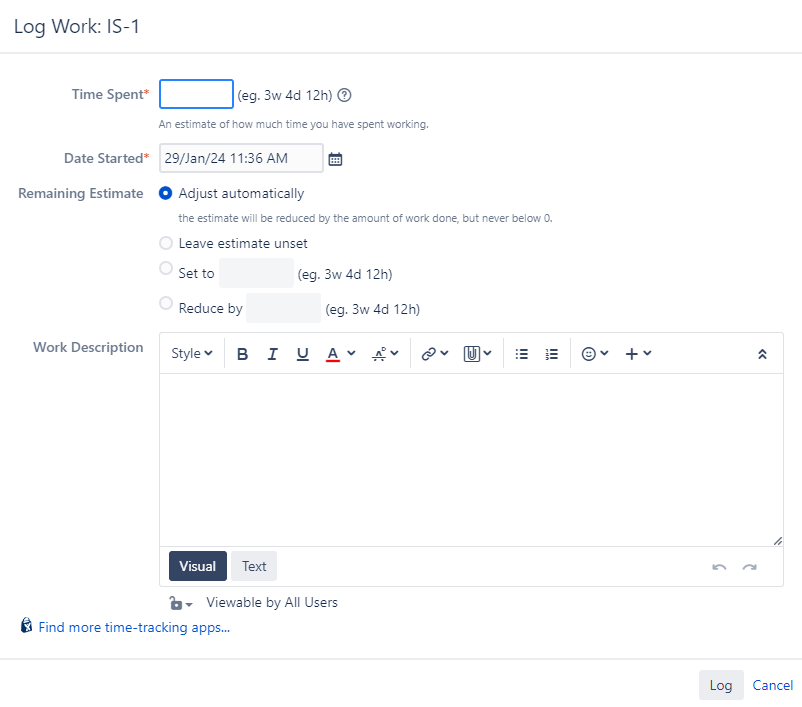 | 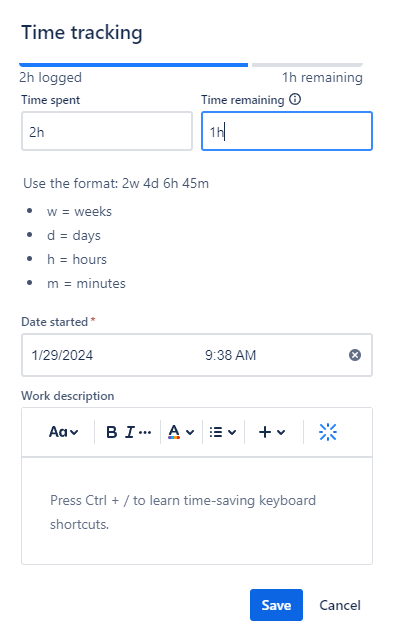 |
One thing you’ll notice is that in Jira Cloud, the remaining estimate is no longer on the issue creation screen, and the layout of the time tracking shows everything in a single bar.
| Cloud | DC |
|---|---|
Create screen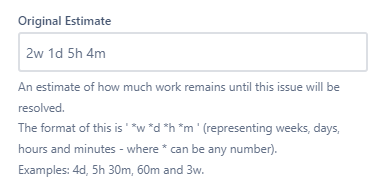 Example 1  Example 2  | Create screen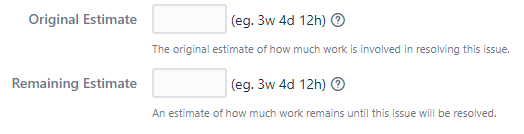 Time tracking 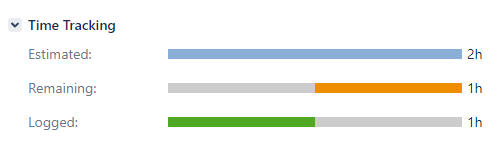 |
Dashboards
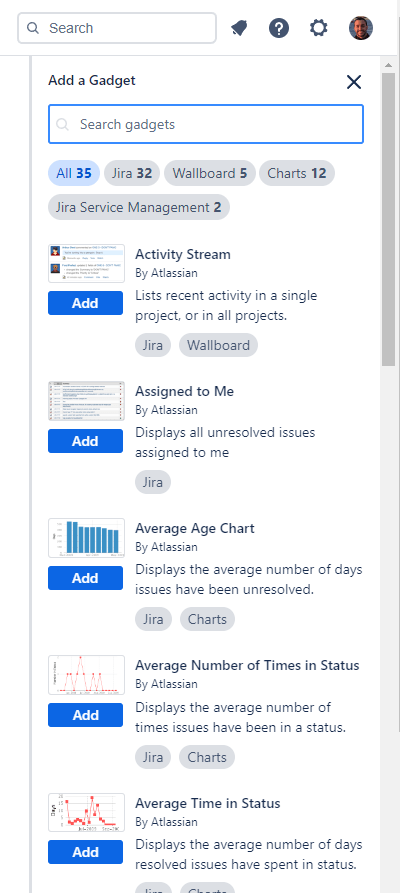
The construction of dashboards in both platforms is similar. While the list of gadgets is displayed as a modal in the DC version, in the Cloud version the list appears on the right.
Add Gadgets
| Cloud |
|---|
 |
| DC |
 |
The list of gadgets is also not completely the same, here are some that you will not find in Jira Cloud, and if you are migrating from the Data Center, they will obviously be lost after migration:
- Agile Wallboard Gadget
- Rich Text
- Text
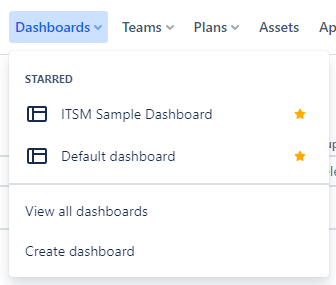
Favorite Dashboards
In the DC version, the panel for your favorite Dashboards is no longer present; instead, it is shown within the actual link in the navigation bar, indicating your favorite dashboards with a star.
| Cloud | DC |
|---|---|
 |  |
Workflows
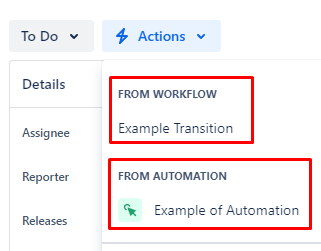
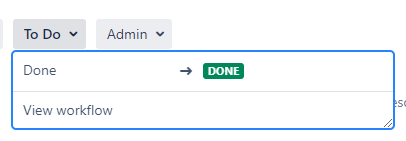
The workflow transitions have been repositioned in Jira Cloud: instead of being grouped with the Assign and “More” buttons, they are now located at the top right of the screen.
An “Actions” button has also been added, which shows all manually triggered automations as well as transitions made to the same status.
| Cloud | DC |
|---|---|
  |  |
The Resolution field also changes its location. In Jira Data Center, it is located in the center of the screen, whereas in Jira Cloud, the resolution is displayed to the left of the Status.
| Cloud | DC |
|---|---|
 |  |
Epic to Story Linking
Atlassian is currently rebuilding this functionality (this article is being written in January 2024). The connection between standard tasks and the Epic in Jira Data Center is made through Jira links. Recently, this association has been made through the Parent field instead of the Epic Link.
| Cloud | DC |
|---|---|
 |  |
In the panel showing the relationship of Stories to an Epic, you will also have the added information of the percentage completion of the tasks corresponding to this Epic.
| Cloud |  |
| DC |  |
In Jira Cloud, you can filter the subtasks that have the resolution field filled.
In Jira Cloud, you will also see the breadcrumb at the top of the page. You can even edit the parent task through it, making it much easier to handle the Epic -> Task and Task -> Subtask relationships.


Users Search
In Jira DC, the key is your username, such as “rodolfo.bortolin.” However, in Jira Cloud, the key for your user is your email address, and behind it, you have an ID called AccountID.
Therefore, if you are transitioning from Jira DC to Jira Cloud, you will notice that the filters or quick filters on the boards may be broken if they are pointing to usernames from Jira DC.
When performing a user search, the auto-complete works by searching for the person’s email. However, when you click to choose the user, the query will automatically switch to point to the AccountID of that user.


This change was made to comply with various compliance regulations. You can find more information about Atlassian’s compliance efforts and resources here: https://www.atlassian.com/trust/compliance/resources
Teams
In Jira DC, you have the concept of teams coming entirely from the Plans feature. It’s where you create teams for plans and reuse them according to your needs. You can also use this field to set the team within the issues and perform searches with it.
The concept of Teams has been improved by Atlassian in Jira Cloud. In addition to the mentioned functionalities for Jira DC, Jira Cloud has added a dedicated Teams link in the main navigation bar.

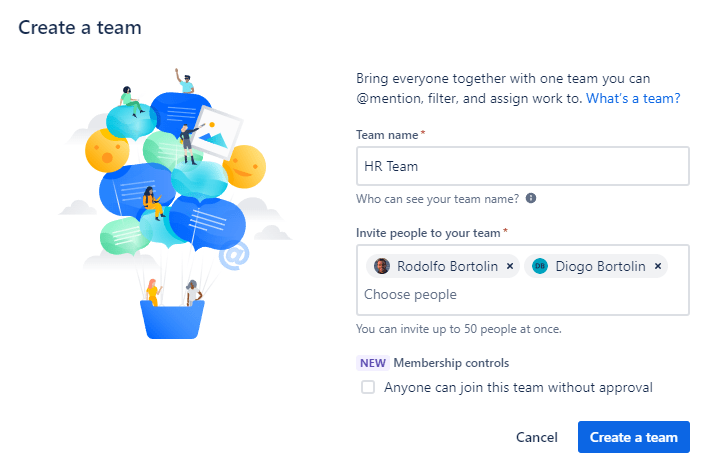
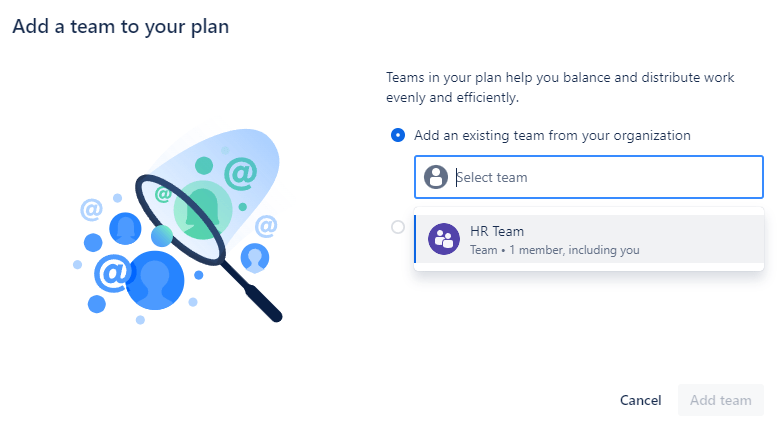
After creating the team, you have a dedicated space for the team in this link, and you can also use this team when creating new Plans.
If you are migrating from Jira Data Center, remember that your filters using Teams will not work after migration because the team IDs change upon migration, but the functionality is quite similar.
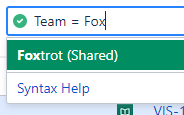
When searching for teams in Jira Data Center, it is immediately replaced by the team ID. The same happens in the Cloud, however the team ID is much larger, and for the search autocomplete to work, you must use “Team[Team]” instead of just “Team“.
| DC | Cloud |
|---|---|
  |   |
Plans
In Jira Cloud, the Program functionality does not exist. Therefore, when migrating from Jira DC to Cloud, for example, this functionality is left behind.

Archive Issues and Projects
Project archiving works similarly in both platforms, but in Jira Cloud, you have the option to send a project to the trash, and after that, the project will be deleted within 60 days.
| Cloud | DC |
|---|---|
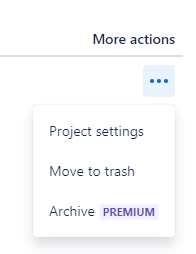 | 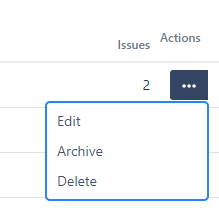 |
In Jira DC, it’s the only platform where you have the possibility to archive an individual issue.
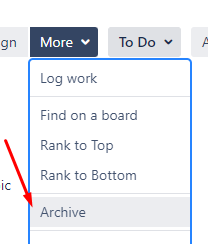
You can find them in the “Archived Issues” functionality, as shown in the image below.
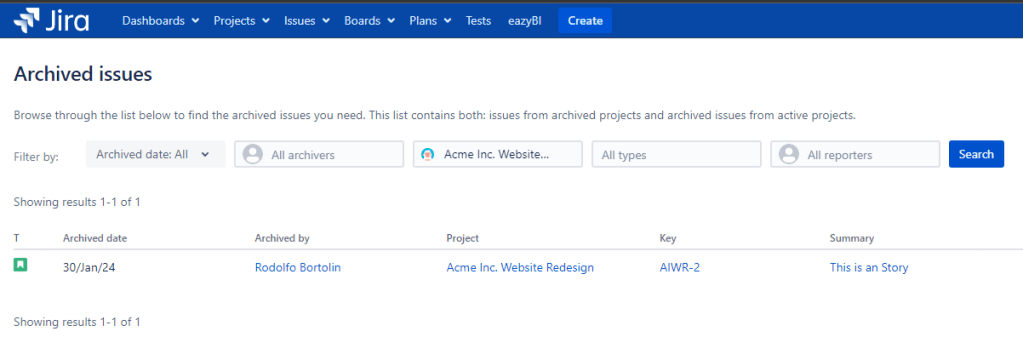
This functionality essentially removes the issue from the Jira index, reducing its size and consequently its “weight,” which in turn increases the speed of searching in Jira. You can learn more about how the Jira index works here.
Project Panel
The side panel of projects also has differences between products.
Starting with Jira Software, you may notice that several features remain the same, such as:
- Backlog
- Active Sprints
- Kanban
- Issues
- Components
- Releases
- Add shortcut
- Reports
However, the similarities end there, as in Jira Cloud, you gain other features such as:
- Timeline – which functions as a kind of Gantt chart for project visualization.
- Goals – coming from the new Atlas tool
- Code – with integrations with Github, Bitbucket, or Gitlab
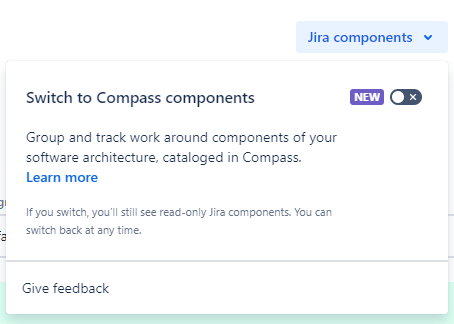
- Components are also integrated with the new Compass tool
- Project Pages – with integrations with Confluence and Google Drive
| Cloud | DC |
|---|---|
 |  |
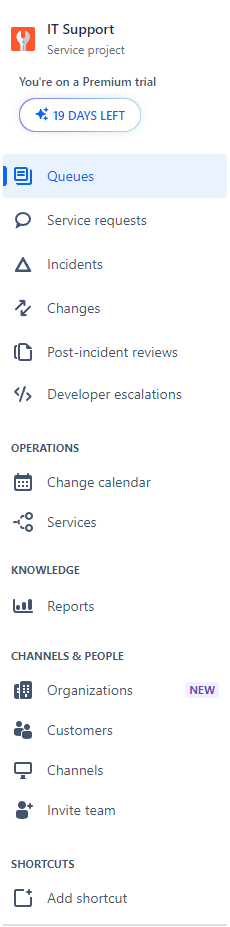
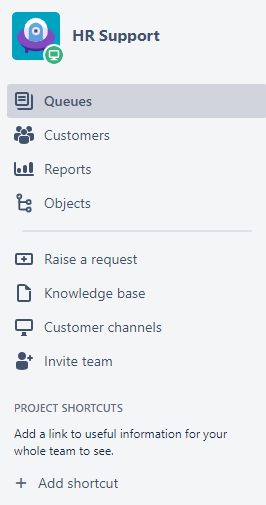
In Jira Service Management, the features that remain the same include:
- Queues
- Customer
- Organizations (in Jira DC, it remains within Customers)
- Reports
- Invite Team
In Jira DC, there is a link to Objects in the Assets functionality that is related to the project. This functionality does not exist in Jira Cloud.
In Jira Cloud, there are many other features, such as:
- Exclusive queues for each process: Change, Service Request, Incidents, Post-Incident Reviews, each of them can have customized queues.
- Developer Escalations: For Request Types that require developer involvement.
- Change Calendar: Displaying a calendar of scheduled changes.
- Services: Integration with Opsgenie for affected services.
| Cloud | DC |
|---|---|
 |  |
Your Profile
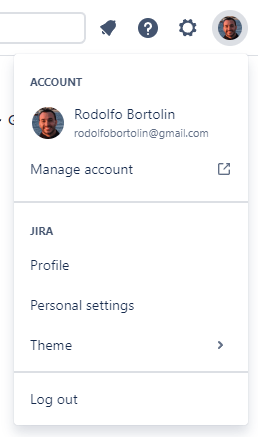
In Jira Cloud, you have access to:
- Manage Account, which is a “global” configuration, independent of which platform or Jira instance you are using (personal, from your company, from a client).
- Note that this configuration takes you to https://id.atlassian.com/.
- Profile: this is a “local” configuration, showing issues or projects you have been working on, and some information about you within the Jira instance you are in.
- Personal Settings, which is also a local configuration, and is where you can set notification preferences, enable lab features, and select your Jira homepage.
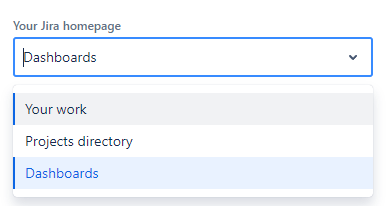
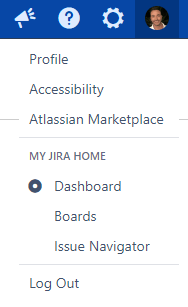
In Jira Data Center, you have the option to select which page will be your “home” through the “My Jira Home” selection. In the “Profile” link, you have access to all your preferences and the ability to create tokens.
| Cloud | DC |
|---|---|
 |  |
Conclusion
In this exploration of the differences between Jira Data Center (DC) and Jira Cloud, I’ve highlighted various distinctions, from user keys to project archiving and additional features available in the cloud version. I hope these insights can help users transition between the two platforms more smoothly.
Whether you’re embracing Jira Cloud’s new functionalities or sticking with Jira DC’s familiar features, understanding these distinctions is key to effectively utilizing Atlassian’s project management and issue tracking tools.

Great content, Rodi!
Obrigada, vou usar bastante.
Abs, 🙂
Kind Regards,
Patrícia Fortunato Montenegro
Snr. Sales Executive for Northern America
+1 (914) 930-4625
https://mailtrack.io/link/317879cf55665e1ed7c5211c848ffc1804e97c6c?url=https%3A%2F%2Fwww.e-core.com%2F&userId=7092688&signature=302706e933024b99
THIS EMAIL IS CONFIDENTIAL. Privacy Notice: This email message and any attachments are intended for the addressee’s exclusive use of the addressee(s) and may contain proprietary, confidential information exempt from disclosure. If you are not the intended recipient, please contact the sender by reply email and destroy all copies of this message. If you are a regular recipient of our emails, please notify us if you change your email address. Thank you!
LikeLiked by 1 person